3D Printing Services
FAQ
How do I submit a print job?
What settings do I use for my print job?
How much will my model cost?
How long are wait times?
Can I choose the colour?
What materials are available?
How durable is PLA?
What printers do you have and how large can they print?
Where do I pick up my finished model?
What are the accepted file types?
Should I expect differences between the model and final print?
What are the accepted forms of payment?
What is your policy on personal or commercial projects?
Basics of 3D Printing and Design
About 3D printing at the DSC
What software to use for designing models
Where to download free models
Would you like like to learn more about how to design and print objects in 3D? Check out our free workshops!
Upload Your Model
Log into your dashboard and click on submit new print job. Upload a 3D file and fill out the fields. Click submit. If you want to know what infill, layer height, scale, and whether to use supports or not please read what those specifications mean below. If you have specific questions regarding your print; email us at dscommons@uvic.ca or submit a job with what you think you want and leave a note in the options. We will help out and answer any questions you may have. Once submitted, your print job will go through the following steps:
- Submitted: Your print job has been submitted via the create new print in the customer dashboard. After submission, the DSC will evaluate the cost. If we have any concerns or require clarification with your request, the DSC will email you prior to pricing your print job.
- Pending Payment: Once the print is accepted, you’ll receive an email with the cost and link to the online payment.
- Paid: After payment is received, your print will be placed in the print queue on a first come, first served basis. (Please let us know if you have a deadline to meet so we can alert you of potential wait times when there are long queues in busy seasons.)
- Printing: The item is currently being printed.
- Completed: The item has finished printing and can be collected from the front desk in the McPherson library.
- Canceled: After 2 weeks of pending payment, the print will automatically be cancelled and need to be resubmitted should it need to be printed. The DSC will not cancel a print if it has not been priced or if it has been paid.
- Archived: The item has been printed. The .stl or .obj file may have been deleted.
What settings do I use for my print job?
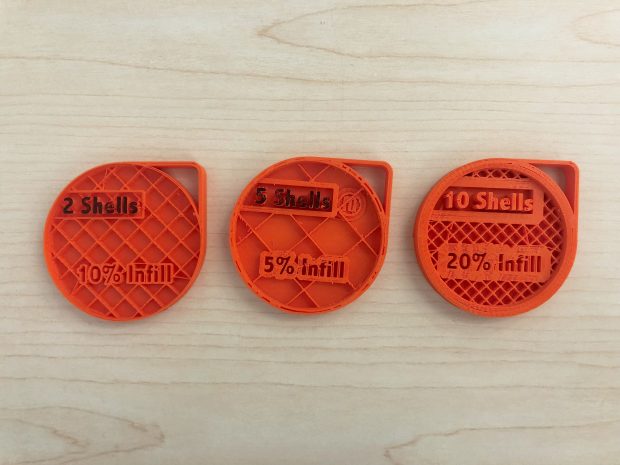
- Infill: The infill is the percentage of the inside of the print that is filled with material. A higher infill makes the object sturdy and able to bear more weight, but can significantly increase the cost. Most decorative items can have 5-10% infill. Having no infill is not advised, unless the object was specifically designed to be printed with zero infill. Increasing the size will also increase the amount of material used, increasing the cost. In the image above, you’ll see the number of shells each print has. The number of shells or shell thickness is how thick the outside layer is. A thicker shell increase strength but also increase cost. Thicker shells can also be useful for post processing, as sanding or refining a print can remove shells and extra shells prevent ruining the print. For additional shells please note this in the additional comment section of your print or jobs will be printed with default shell thickness.
- Scale: The scale is the size of the print by comparison to the size it was designed to be. Many models are printed at 100% scale, but it is also common to change the size. Keep in mind: when decreasing model size, you will also be decreasing wall thickness and the size of detail. This can result in a loss of quality when printing, if taken too far.
- Layer Height: 3D printing is done by slicing the digital object horizontally into layers, then printing each layer one at a time. Layer height is the thickness of each slice. The smaller the layer height, the finer the detail of the finished print. Small layer heights take significantly longer to print because more layers are needed. Standard print jobs are printed at 0.2mm layer height and for most jobs, this is the best option. The Makerbot printers will print to as fine as 0.1mm and the Ultimaker 3 will print down to a 0.06mm layer height
- Supports: It’s generally best to have Supports turned on. The printing software we use will only generate supports where needed. We offer two option for support materials; regular PLA supports, which break off after printing but can leave aesthetic marks and may require sanding to get rid off. The alternative is water soluble PVA supports, which allow supports to be built in places that PLA supports would be difficult or impossible to remove. PVA supports also dont leave aesthetic marks, creating a nicer initial finish. However, PVA costs more at 20 cents per gram and increases printing times.
How much will my model cost?
The cost is determined by the weight and type of material used. Material costs vary from 10 cents to 20 cents per gram. Supports and rafts are included in the cost. There is a minimum payment of $2 for print jobs.
How long are wait times?
This varies depending on the time of the semester. During end of term when projects are due, it may take a couple of weeks or more, since one print job can potentially take many hours. If it is a slow time, turnaround is less than a week. It is best to submit your print job early in case there are technical issues or redesigns needed, or in case there is a queue for print jobs. It is generally best to let us know if you have a deadline so that we can alert you of potential wait times if there is a long queue ahead of you.
Can I choose what colour it prints in?
We have different coloured filaments loaded into the printers at a given time and your print will be printed with whichever filament is currently loaded in the printer.. When you submit your print job, if your project requires a specific colour, please specify this in the additional comments and we will do our best to accommodate the request based on current material availability.
Two-colour printing is possible with the DSC’s Ultimakers. Here are some things to note while creating your object:
- To complete a print, projects need to be exported in either an .’stl’ file or .’obj’ file
- Before exporting your complete .stlj file, make sure to group objects of the same colour together and export each as a different file. These will fit together for printing to complete your two colour creation.
- Make sure to communicate your colour preferences when requesting a print job; to make sure that your colour choices are available at the DSC.
- Note: Dissolving PVA Supports are not available with two colour print jobs.
DSC staff cannot divide your models into multiple parts for two-colour printing. If this is something you would like to learn, the following videos could be used to help you learn this skill:
- TinkerCad: https://www.youtube.com/watch?v=jJ_CRPcP1iw
- Fusion 360: https://www.youtube.com/watch?v=djAabRlFA50
- PLA (Polylactic Acid)
- A form of plastic made from natural starches like cornstarch that will biodegrade in some industrial composting facilities.
- This material is the best for detailed models.
- Available in multiple colours.
- We charge 10 cents per gram.
- PVA Dissolving Filament
- Also made from starch. It dissolves when you put it in water (needs to be placed in water for several hours).
- Used for supports.
- We charge 20 cents per gram.
- PETG
- This is a material similar to PLA, benefits of PETG include increased heat resistance.
- Not great for projects with a lot of details since this material tends to be stringy.
- Currently only available in red.
- We charge 10 cents per gram.
- TPU 95a
- A material with medium flex, the texture is similar to rubber.
- Better for simple shapes that do not require support since post-processing of pieces can be challenging due to stringing.
- We charge 20 cents per gram.
**If you are not sure what material would be best for your piece, send us an email or book a consultation with us at dscommons@uvic.ca.
Note: The DSC does not have a resin printer, for projects requiring this type of printing, we recommend you see what other printing services are available, such as the Victoria Makerspace (makerspace.ca), 3dhubs.com, and Replik8.
- Higher infill density as well and number of shells will increase the strength of a piece, but it also increases cost since it makes a printed object weigh more.
- PLA material is great for most projects, including decorative objects, game pieces, cases, and fidgets toys. Over 90% of all jobs printed in the DSC are made using PLA!
- However, PLA can be shatterable so if you put a heavy load on a PLA object. If this needs to be done always use protective eyewear to protect against the piece shattering into tiny shards.
- PETG is more heat resistant than PLA and should be used for pieces that will be exposed to heat or stored in a very warm room.
- If you are not sure what material would be best for your piece, send us an email or book a consultation with us at dscommons@uvic.ca.
Printer Information and Filaments Used
| Printer Models | Length | Width | Height |
|
MakerBot® Replicator® (5th Gen) Prints PLA material |
25.2 cm
|
19.9 cm
|
15 cm
|
|
MakerBot® Replicator® + Prints PLA material |
29.5 cm
|
19.5 cm
|
16 cm
|
|
Ultimaker 3 PLA (Extruder 1) |
21.5 cm
|
21.5 cm
|
20 cm
|
|
Ultimaker S5 PLA (Extruder 2) |
33 cm
|
24 cm
|
30 cm
|
Where do I pick up my finished model?
Once a print is finished printing, an email will be sent and the print can be collected from the front desk of the McPherson library.
What are the accepted file types?
*.stl is the most common and ideal file type to submit for printing. We also accept .obj models. Files are accepted by the web app that are less than 200MB. For larger files or other file types, please contact the DSC first at dscommons@uvic.ca
Should I expect differences between the model and final print?
When submitting your print, be aware that the final result may not look exactly as the 3D file you submitted. Intricate details can be lost as the printer may not be able to print as fine due to the nozzle size. If a detailed print is required, a finer layer setting is recommended (0.06 is the finest layer height offered). Supports and rafts will be left on and need to be removed carefully (or dissolved in water for PVA supports).
What are the accepted forms of payment?
The online payment accepts Mastercard and Visa credit cards. Online Interac transactions from RBC, TD Bank, and a select few credit unions are also accepted. If your credit/debit cards turn out to be not on the list of accepted cards, you can contact us to set up an in-person payment at the McPherson Library front desk. There is a minimum payment of $2.
What is your policy for personal or commercial projects?
Personal jobs are permitted and encouraged but are given the lowest priority to try to ensure that academic jobs, which may be time-sensitive, can be done before assignment deadlines.
Last-minute submissions, including academic projects, might not be able to be completed in time due to limitations in the capacity of our equipment and staff. Depending on the scope of your project, providing as much lead time as possible is required.
Personal 3D print projects are limited to 35 hours of printing a month and hours are tracked by DSC staff upon submission of files through the DSC website. During quieter times DSC staff, at their discretion, can allow students to submit larger projects.
All projects submitted through the DSC should be for academic, personal use, and prototyping purposes. Commercial projects are not permitted. If you have questions regarding the eligibility of your project, please contact us at dscommons@uvic.ca to talk to our staff.
Basics of 3D Printing and Design
About 3D printing at the DSC:
There are several ways to print objects in 3 dimensions. The printers at the DSC do it by Fused Deposition Modeling. A digital 3D model is first cut up into horizontal layers. Our printers then take filament on spools into a heated extruder. The extruder melts the material and draws the layer onto a flat surface called a buildplate. Once a layer is finished, the buildplate lowers and the second layer is drawn on top of the first layer. This continues until all layers have been printed.
What software to use for designing models
- TinkerCad is a free 3D modeling program that runs completely in the browser. It is an easy to understand tool and great for those new to 3D modeling. The DSC offers an intro workshop to 3D design using TinkerCad.
- Fusion 360 is another modeling software, which is free for students and staff of UVic, but must be installed in order to be used. Fusion 360 is best for those who have some 3D modeling experience. The DSC does offer an intermediate workshop for anyone interested in learning more.
Where to download free models
Would you like like to learn more about how to design and print objects in 3D? Check out our free workshops!
Please email us at dscommons@uvic.ca or drop by our office if you have any questions. Happy printing!