Digital Badges
![]() The Digital Scholarship Commons (DSC) awards digital badges, or informal credentialing, for the successful completion of most of our workshops. We award badges in order to help workshop participants make public the fact that they have developed skills in DSC workshops. DSC electronic badges are cryptographically signed and have the recipient’s email address embedded in the signing so that it cannot be used by anyone else. Also embedded in the badge is a link to the learning outcomes for the workshop so that employers or anyone who sees the badge can determine what was done to earn the badge. DSC badges are awarded at the request of workshop participants after a DSC staff member has verified that they have successfully completed the required activities.
The Digital Scholarship Commons (DSC) awards digital badges, or informal credentialing, for the successful completion of most of our workshops. We award badges in order to help workshop participants make public the fact that they have developed skills in DSC workshops. DSC electronic badges are cryptographically signed and have the recipient’s email address embedded in the signing so that it cannot be used by anyone else. Also embedded in the badge is a link to the learning outcomes for the workshop so that employers or anyone who sees the badge can determine what was done to earn the badge. DSC badges are awarded at the request of workshop participants after a DSC staff member has verified that they have successfully completed the required activities.
To earn a DSC workshop badge do the following:
- Sign up for a workshop.
- Complete required number of activities in the workshop (varies per workshop).
- Request a digital badge from the instructor by showing the instructor your completed work and asking for a badge. The specificinstructions will be listed in each workshop.
You will usually receive your badge via the email address you signed up for the workshop within a week. The DSC uses the Canvas Badges badging system which supports open standards for their badge creation. You do not need a Canvas Badges account to earn DSC badges, however, Canvas Badges provides a convenient way to store badges, call a “Backpack”, and organizes them in ways that make them easier to share. To sign up for Canvas Badges, go to https://badgr.com/ click on the blue Create an Account button, and follow the instructions provided. NOTE: Please use the US version of Canvas Badges, not the Canadian version (the Canadian version was not an option when we set up our Badger provider account).
How do I let employers or others know that I’ve earned a badge? Use one or more of the following methods to share your badge with employers or others:
- Share your badges on your LinkedIn profile (see below for details on how to post to LinkedIn).
- Share your badges on LinkedIn or other social media platforms that employers use using the Canvas Badges “Share Badge” feature.
- Share your badges on your personal website (WordPress.com for example), by linking to your public Canvas Badges backpack.
- Copy and paste the badge images and descriptions into your resume.
Adding badges to your resume
When adding to your resume include the Badge Title, the link, and a brief summary of the criteria which can be found when clicking on the badge in your Backpack in Canvas Badges. Here are the steps to adding badges to your resume
-
- Include a section for certifications to put your digital badges and download your badge as a png file in order to include the badge as a photo on your resume.
- To download your badge as a png file, right click and save as. Then add it to your resume on a Word document
- Next right click the image within your Word document and press the link option. Paste the URL of your badge. The URL can be found in your Backpack on your Canvas Badges account. If you have multiple badges you can share a link to your entire Backpack or if you have just a few you can do it individually as well.
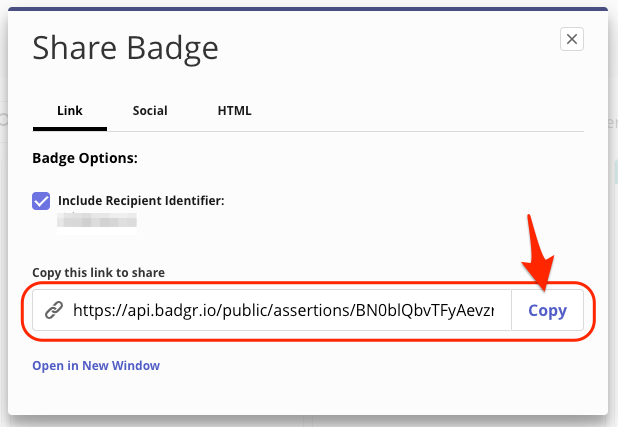
Share your badge:
- To share your badge via a link, select link. This could be to add to your resume, your blog or another platform.
- To share to LinkedIn, select share via social
- You can also share your badge using HTML
- Access the Canvas Digital Badging Backpack sharing Instructions here to learn to create a collection add to your resume, add to social media, make a QR code or a shortened URL and embed into WordPress. There are also instructions for adding a badge on Brightspace.
Adding badges to your LinkedIn Certifications
- Sign in to LinkedIn and go to your profile page.
- Select the Add profile section button and select Licenses and Certifications.
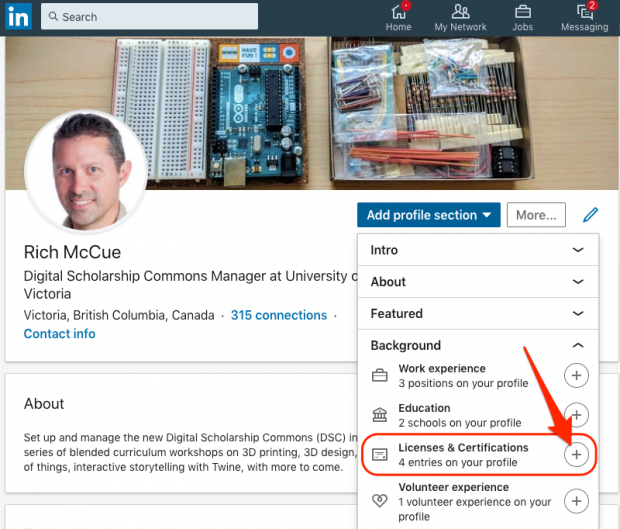
- A new dialog box will open prompting you to enter information about your badge award.
- From your Canvas Badges Backpack, copy the share URL of the badge you wish to add.
- Paste the badge share URL into the Certification URL field of the LinkedIn certification dialog box.

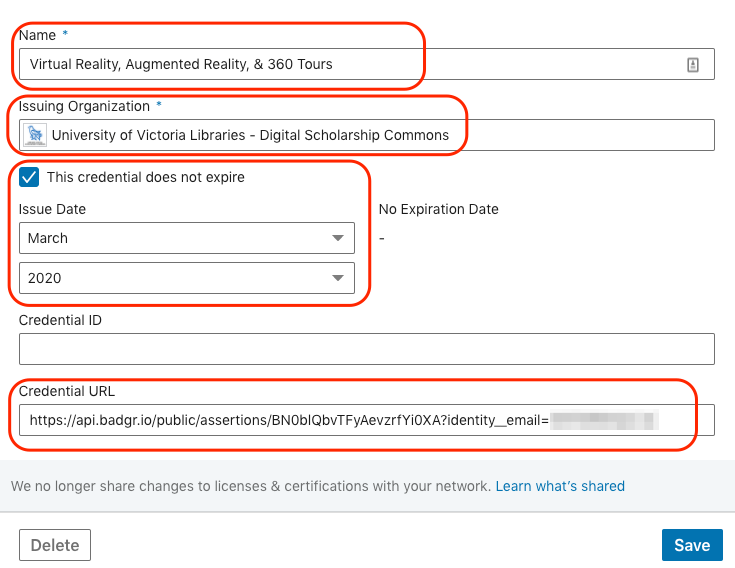
- Name: Enter the title of the badge.
- Issuing Organization: Enter the name of the badge issuer and/or organization. LinkedIn may suggest an organization with which you may align your badge award. Please note: LinkedIn displays the Organization’s logo for this entry. It is not possible to display the badge image here due to LinkedIn’s posting restrictions.
- Expiration: Check the box if the badge award does not expire.
- Issue Date and Expiration Date: Enter the date(s) as they appear on the badge.
- Credential ID: Leave blank or paste the unique ID string from the badge share URL. It is typically the last string after “/” and looks like this: bcd41b91-a83f-4dae-a51f-cd979a6cc8b8
- Credential URL: Paste the share URL of the badge award here.
- Click Save.
- From your LinkedIn profile, navigate to the Licenses & Certifications section to view your badges.