At the Intersection of Art and Sport

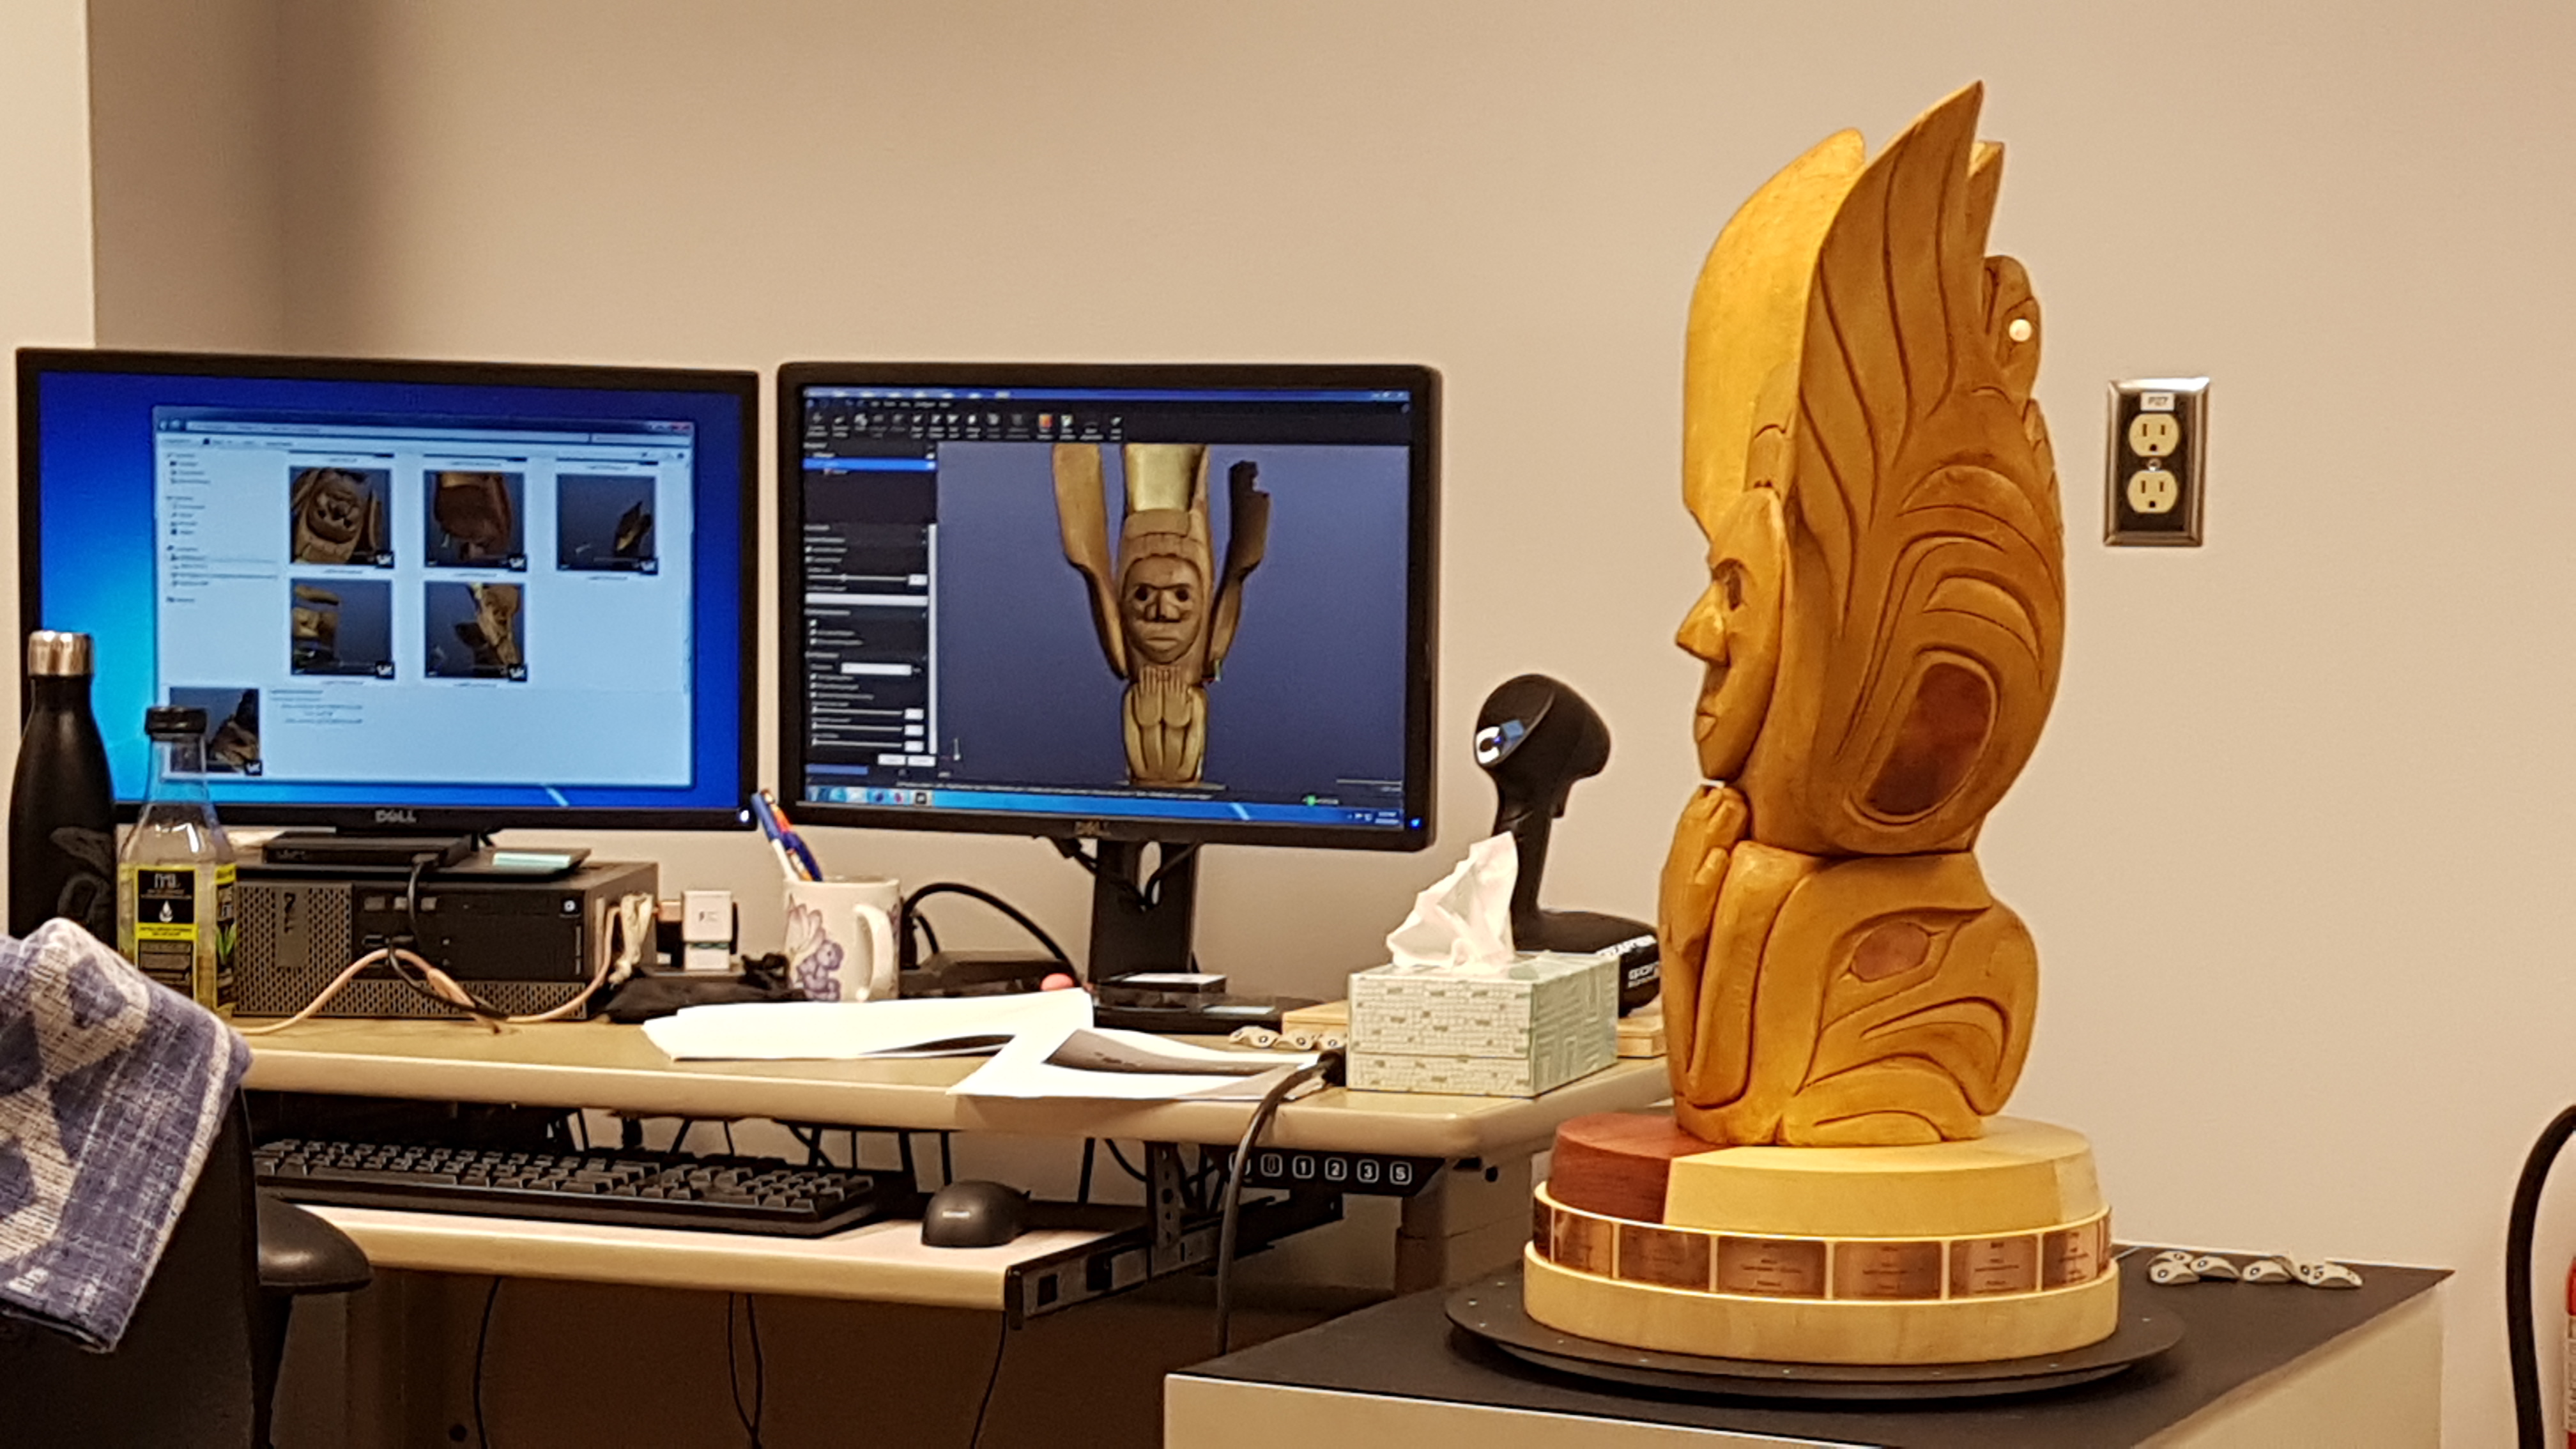
When you think of sports championships, there is always the goal of winning the big trophy – Grey Cup, Stanley Cup, Rose Bowl, World Cup, and so on. When the National Aboriginal Hockey Championships (NAHC) needed a trophy, they turned to artist Carey Newman to carve one. He created the Turtle Island Trophy. While the trophy is a beautiful artwork in and of itself, it is not the most durable object to hoist overhead on the ice, so the artist and the NAHC approached us to 3D scan the trophy and provide a file to use to create a copy.

All the arrangements were made and last October, the trophy was delivered to the Libraries in its own custom made traveling case. Leanne was given lead on the scanning while I helped troubleshoot as needed and stepped in at the end of the process to help train Leanne on the software we use to edit the final file. It was Leanne’s first big job on the 3D scanner and often she wasn’t sure if she was using the tools incorrectly or if the tools were failing. In almost every case, the tools were letting us down.

Image of the Turtle Cup on the turntable and a scanned version of the cup on the monitor at the 3D scanstation

Getting some early scans of the trophy

The Turtle Island Trophy pushed our hardware and software beyond its limits; we had to ask our tech department to upgrade the RAM in the dedicated workstation not once but twice during the process because the files became so large that they repeatedly froze and crashed the system. We also had to adapt to an upgrade of the proprietary software that introduced a significant change to the workflow.

Our first inspection of the Turtle Island Trophy identified the potentially tricky parts to capture – copper accents and plates (denoting each championship team and year), the darker stained wood, and the shape of the wings. As scanning began we confirmed that the wings and the base (which included the darker wood and the copper plates) were going to be the most difficult to accurately capture.

One of the biggest challenges we had was determining whether or not to use targets or not – not using targets is our default. As scanning progressed, it became clear that there was not quite enough detail to allow for the cameras track and capture the surface accurately. We put a call into Creaform, the company that makes the 3D scanner hardware and proprietary software to determine what was the best way forward and after testing a discrete part of the carving we determined the adhesive was safe for the surface and proceeded with targets in place for the remaining scans. The company also walked us through the solution to removing targets from the scans – a solution that unfortunately meant early work had to be abandoned and new scans created. This was a huge disappointment as Leanne had close to a complete scan, but the new scans came along quickly and she soon reached the same point of the first set.

At this stage, our unit was physically relocated within the library and resulted in several weeks of downtime for the 3D workstation and the project was put on hold. When Leanne  was able to return to scanning, she was down to just a few trouble spots. Getting into the vee between the wings and the body of the carving proved the most challenging part to scan – there simply isn’t enough space to change the angle of the handset so even after many attempts we were left with gaps in the 3D model. As we approached the deadline the decision was made to stop scanning and “fix it in post” using the Meshmixer program.

image of a 3D model of the Turtle Cup in the Meshmixer software

working with Meshmixer to fill the gaps in the model

Meanwhile Leanne hit a wall with the merges – the files had become so large that the computer repeatedly crashed. Our tech department knew that there was enough RAM physically in the machine but discovered that Windows 10 had automatically allocated only a small portion of that for file swapping. Once that was corrected, the merges took time but stopped crashing the system.

When Leanne had finished merging all the pieces, we took the completed but not watertight model and exported it to work with in Meshmixer.  First, I walked Leanne through the basics of the program, the parts I had learned from our work study student who scanned, edited, and uploaded most of the Cowan specimens. However, we needed the software to do more than the basics. The part of the scan where the wings meet the body still had large gaps that when auto-filled produced a blob. I had to sort out how to fill the wing side of the gap and the body side of the gap separately. I knew what I wanted to do: I wanted to draw a series of lines/bridges across each gap and fill the isolated parts until there was only a small gap remaining to autofill.

Surprisingly but happily I was able to find the answer among the help pages for the Meshmixer software rather than in some frustrated-users forum. I did the work to fill that big gap as Leanne watched then she took over to finish smoothing the rough digital edges. Once we had a workable model, we coordinated with the Digital Scholarship Commons to print a scaled down model.

We were very pleased with the results, as were the stakeholders who saw the printed miniature version when they came to collect the trophy itself. The files are now in the hands of the NAHC for reprinting as they see fit! Below are images of the completed print model alongside the original Turtle Island Trophy. We all felt very pleased to hold that tangible artifact of our weeks of hard work. That pleasure extends past our department. Rick Brant, Executive Director of Indigenous Sport, Physical Activity & Recreation Council (ISPARC) told us, “The legacy of this work will be the tremendous sense of pride that players, organizations, and communities across Canada will share as a result of being able to bring home their own replica of the Turtle Island Cup”

Image of the Turtle side of the Turtle cup with scaled 3D printed version.

Turtle side of the Turtle Island Trophy with scaled 3D printed version.

image of the cup side of the Turtle cup with scaled 3D printed version.

cup side of the Turtle Island Trophy with scaled 3D printed version.

A new dimension in art


This fall, our department received a request to collaborate with artist Shawn Shepherd using the 3D scanner. He wanted to learn more about the potential for capturing and the possibilities of duplicating or remixing his dimensional artworks. At the right is a screenshot of the piece he chose to work with, as represented on the artist’s portfolio site:

The piece Shepherd wanted scanned was a painting that had a lot of texture to it and I was skeptical about the capabilities of the scanner. The texture in the painting consisted of both straight-edge peaks and valleys in the centre, a deep “moat,” and more fluid “stucco” texture around the outer edge. To my delight, we were able to get a fairly good scan in the end. I scanned the centre area first then each side and finally the underside. Each of these scans were stitched together using the image capture software until a final image could be created. Below is the final merge of the top pieces; you can see one corner edge is still rough but we were able to fill that in when we did the underside:

The first challenge was that the piece was too large to fit on the turntable. We picked up some black poster board to use as the base and placed it over the file cupboard on casters that we repurposed as the 3D scan table. The art fit fairly well on the table.

Next, we did not want to affix target dots to the textured front of the art (we did eventually use targets on the back of the piece). To compensate, we placed turtle targets beside the edges and used those for triangulation. The software also picked up natural features fairly consistently as there was just enough variation in the edges of the piece. In the image to the right, each of the blue circles is a unique natural feature. As you can see, most are in the peaked edge texture and not the straight-edge centre pieces

The most difficult portions were the moat, specifically the upper side of the inset area, most of which had to be filled in manually in post-editing. The other challenge was capturing the back of the piece because there was so little variation in colour and texture.

Working with art definitely has its own challenges; each piece is one of a kind and the materials seemed more fragile than many with which we work. I was keenly aware of how we handled it, how it was propped up at certain times to get the right angle, and where the target dots could best be placed. Shepherd was a little more cavalier than I was about placing targets – I reluctantly added them to the back of the piece; we would have had much more trouble without them.

In the past year, we have learned a lot about the strengths and limitations of the Creaform scanner and this was another good test. One completely unanticipated problem we encountered was a breakdown in the equipment — specifically the cable running between the scanner and the computer. The second day of scanning ended up being extremely difficult because of this breakdown as it meant the cable had to be held in a certain way in order for all the wires within to make contact and thus transmit the information. I stubbornly persevered and captured the necessary data but after this project we set aside the equipment until a replacement cable was received (which corrected the issue).

After doing the capture, and merging the files, we were left with an unwieldy 6.7 GB file. Once we exported it as an object, it was reduced to a fraction of that size, about 147 MB. From there, we imported it into Meshmixer to fill gaps, repair flaws, and basically correct any major flaws. To give you an idea of the number of these flaws in the image capture, each of the dots and lines in the image below corresponds to a correctable flaw.

The goal is to make the model watertight so that it can be printed. Most of these can be done using the single “auto repair all” button — some require greater finesse. After the repair, the final object and its corresponding files (including the Bitmap of the texture) may then be zipped and uploaded for display online.

At the artist’s request, the final 3D version of this file has not been uploaded to our collection.


Update! In the January 2018, the artist returned to the Digitization Lab with some examples of the objects he had been able to make using a CNC machine. The reproductions are smaller in scale than the original but maintain the texture. The artist created three reproductions, each painted differently.

reproductions created from the 3D scanned files of the original artwork