
[et_pb_section bb_built=”1″ admin_label=”section” _builder_version=”3.0.47″][et_pb_row admin_label=”row” _builder_version=”3.0.47″ background_size=”initial” background_position=”top_left” background_repeat=”repeat”][et_pb_column type=”4_4″][et_pb_text _builder_version=”3.17.3″ background_size=”initial” background_position=”top_left” background_repeat=”repeat” background_layout=”light”]
This page is under construction. Check back soon to see new tutorials.
[/et_pb_text][/et_pb_column][/et_pb_row][et_pb_row _builder_version=”3.0.105″][et_pb_column type=”4_4″][et_pb_tabs _builder_version=”3.17.3″][et_pb_tab _builder_version=”3.17.3″ title=”Bibliographic and Research Management Software” use_background_color_gradient=”off” background_color_gradient_start=”#2b87da” background_color_gradient_end=”#29c4a9″ background_color_gradient_type=”linear” background_color_gradient_direction=”180deg” background_color_gradient_direction_radial=”center” background_color_gradient_start_position=”0%” background_color_gradient_end_position=”100%” background_color_gradient_overlays_image=”off” parallax=”off” parallax_method=”on” background_size=”cover” background_position=”center” background_repeat=”no-repeat” background_blend=”normal” allow_player_pause=”off” background_video_pause_outside_viewport=”on” tab_text_shadow_style=”none” body_text_shadow_style=”none” tab_text_shadow_horizontal_length=”0em” tab_text_shadow_vertical_length=”0em” tab_text_shadow_blur_strength=”0em” body_text_shadow_horizontal_length=”0em” body_text_shadow_vertical_length=”0em” body_text_shadow_blur_strength=”0em”]
Zotero (zoh-tare-roh) is a free, open-source, well-supported tool that is meant to be “your personal research assistant.” Originally, it was created as a bibliographic manager, but it has become much more powerful over the years and allows you to “collect, organize, cite, and share your research” in useful ways. Moreover, Zotero “is developed by an independent, nonprofit organization …. With Zotero, you always stay in control of your own data.”
If you’re looking to streamline your scholarly research workflow; collect sources directly from the web; organize your annotations, PDFs, and notes in one place; create and manage citation styles and bibliographies with one click; and be assured that your data will be exportable; then Zotero is the tool for you.
This tutorial will walk you through the process of installing Zotero, its browser connectors, and its most useful plugin for research management, “zotfile.” The combination of these three tools will give you the ability to easily collect, organize, cite, and share your research.
[/et_pb_tab][et_pb_tab title=”Textual Analysis” _builder_version=”3.17.3″ use_background_color_gradient=”off” background_color_gradient_start=”#2b87da” background_color_gradient_end=”#29c4a9″ background_color_gradient_type=”linear” background_color_gradient_direction=”180deg” background_color_gradient_direction_radial=”center” background_color_gradient_start_position=”0%” background_color_gradient_end_position=”100%” background_color_gradient_overlays_image=”off” parallax=”off” parallax_method=”on” background_size=”cover” background_position=”center” background_repeat=”no-repeat” background_blend=”normal” allow_player_pause=”off” background_video_pause_outside_viewport=”on” tab_text_shadow_style=”none” body_text_shadow_style=”none”]
Under construction. Check back soon!
[/et_pb_tab][et_pb_tab title=”Geospatial & GIS” _builder_version=”3.17.3″ use_background_color_gradient=”off” background_color_gradient_start=”#2b87da” background_color_gradient_end=”#29c4a9″ background_color_gradient_type=”linear” background_color_gradient_direction=”180deg” background_color_gradient_direction_radial=”center” background_color_gradient_start_position=”0%” background_color_gradient_end_position=”100%” background_color_gradient_overlays_image=”off” parallax=”off” parallax_method=”on” background_size=”cover” background_position=”center” background_repeat=”no-repeat” background_blend=”normal” allow_player_pause=”off” background_video_pause_outside_viewport=”on” tab_text_shadow_style=”none” body_text_shadow_style=”none”]
Under construction. Check back soon!
[/et_pb_tab][et_pb_tab _builder_version=”3.17.3″ title=”Reading Technical Documentation” use_background_color_gradient=”off” background_color_gradient_start=”#2b87da” background_color_gradient_end=”#29c4a9″ background_color_gradient_type=”linear” background_color_gradient_direction=”180deg” background_color_gradient_direction_radial=”center” background_color_gradient_start_position=”0%” background_color_gradient_end_position=”100%” background_color_gradient_overlays_image=”off” parallax=”off” parallax_method=”on” background_size=”cover” background_position=”center” background_repeat=”no-repeat” background_blend=”normal” allow_player_pause=”off” background_video_pause_outside_viewport=”on” tab_text_shadow_style=”none” body_text_shadow_style=”none” tab_text_shadow_horizontal_length=”0em” tab_text_shadow_vertical_length=”0em” tab_text_shadow_blur_strength=”0em” body_text_shadow_horizontal_length=”0em” body_text_shadow_vertical_length=”0em” body_text_shadow_blur_strength=”0em”]
Available as a PDF | or on Github
Technical documentation is any material meant to accompany a particular tool, software, or technology which can be descriptive (what problem does this solve?) or instructional (how-to). Although documentation (“docs”) comes in various formats, this guide focuses on software documentation in textual format published on the web.
Here’s the most common scenario in which I read documentation: I’m just starting a project and have a specific goal in mind, but I don’t how to go about doing it. I may not even know what programming language, device, etc. to use. Can I do this with something I already have or should I install a dedicated application for it? If I want to make a sound-reactive light display, should I use Arduino or Raspberry Pi? What physical parts (LEDS, microphone, etc.) do I need? Which seems less complicated and time-consuming?
In short, I’m reading docs because I want to know what steps are involved and what the final product might look like—without investing too much time and resources upfront or reinventing the wheel. However, reading documentation is like trying to find a word in a dictionary without knowing how to spell it: how do I find what I’m looking for when I don’t know what to look for?
This guide walks through types of documentation, how to parse them, and common conventions in web documentation (e.g. README files on Github). It provides advice and tips to help you navigate docs and sift the dizzying amount of information on the internet. Although much of this advice holds true for many types of software, I’ll be using examples from Python, Machine Learning, Command Line, Arduino, JavaScript, and Twine.
OverviewTypes of DocumentationReading and Using Documentation |
Types of Documentation

Documentation can look very VERY different from source to source, and not all documentation is well-written (arguably, most is not). Docs vary in organization and level of detail, among many other ways. What follows is a brief, non-exhaustive typology of stuff on the web:
Tutorials
Usually, step-by-step instructions to accomplish a specific task. Even if it’s not exactly what you’re looking for, similar projects might still have useful code you can modify. See examples from Programming Historian.
Topical Guides
Information about a specific subject or feature. See example about Items in the Internet Archives library and API.
Reference Guides
This type of doc most resembles a literal dictionary. It typically provides a bare-bones description of a specific function or command. Especially useful if you know vaguely what you need but you forget the syntax (what you actually type in). See example: Arduino’s reference guide for functions.
Cookbooks
A collection of code examples or recipes for a specific software. I’ve never found this organically online (examples are often rolled into other types of docs), but it seems pretty common in e-book or book format. You can find a lot of them through UVic Libraries and probably other library search portals too.
Help Forums
Stack Overflow is the most (in)famous and often most helpful, although you can also find stuff in GitHub discussions or sometimes even reddit.
README Files
This is what you’ll find on GitHub. See example: torch-rnn docs by Justin Johnson. Most README files are split into sections:
- Installation: How to install something step-by-step.
- Dependencies or Requirements: Other things that need to be pre-installed for it to work (e.g. code libraries or other software).
- Support: Whether the software requires a specific operating system (e.g. Windows) or version (e.g. Python 3 vs. Python 2).
- Getting Started, Quickstart, etc.: Probably the most useful part of the doc. Usually contains simple examples to demonstrate a software’s capabilities.
- Examples: This may be dispersed across sections or silently packaged in one folder named “examples” or “samples” or something similar.
- Features: Things the software can do.
- License: Any conditions or rules for distribution of the software.
- Updates or Release History: Notes about new releases, fixes, and the like. If a piece of software seems outdated, it may be depreciated and non-functional.
Note: Most documentation incorporates aspects of more than one type. In fact, it’s rare to find a doc that doesn’t.
Reading and Using Documentation
1. Narrowing Your Search Terms
This is half the battle, since knowing an accurate search term will yield better results. For example, say I want to make a light display with Arduino that flashes different colours. Googling “arduino light display sound” might give me a wide range of results, some of which are unrelated to my project. But based on that, I might find that “sound-reactive LED arduino” or “arduino music visualizer” is closer to what I’m looking for. Additionally, consider if you can refine your search using boolean operators or other methods.
2. Skim It
No one reads documentation for the plot. Like other kinds of research, you’ll likely skim docs and slow down if something catches your eye. It’s often helpful to look at an overview or table of contents section first. You might even stumble across a solution to another problem in the process.
3. Code and the Command Line
In case you haven’t guessed already:

Code can also be formatted inline. Often, the code blocks contain commands for Linux/Bash Command Line. You can find this in Terminal on a Mac or Bash on Ubuntu on Windows in Windows 10. For older Windows operating systems, you can try Git BASH. (For more on the Command Line and what it’s for, see this excellent explanation by Jojo Karlin, Jonathan Reeve, Patrick Smyth, Steven Zweibel. You can also play around with the Command Line in DH Box without needing to set it up or accidentally deleting something.
How can you tell if some code is meant for the Command Line? You might see things like this:

With most code blocks, the documentation writer likely won’t specify what language it’s in. Readers are expected to know from the syntax of the commands and this can be confusing for beginners.
Let’s look at an IRL example from the torch-rnn documentation written by Justin Johnson:

This is a series of commands you would type into Command Line (having installed Lua). Note that you have to press Enter to run something in Command Line, so make sure you do that after every line. The words #after the hash are comments (we’ll talk about them later), so you don’t need to type them into the Command Line console.
4. Copy/Paste
When I talk to people in my home department (English Literature), some are reluctant to copy/paste and use code they find on the internet in their own programs. In the Humanities, we’re taught that using other people’s work without giving credit, formatted according to specific conventions, is plagiarism and should be avoided.
For better or worse, this is generally not the way coders operate. If anything, copy/pasting code is encouraged. Not only does it save you time and effort (and possibly a lot of frustration), but you can be reasonably confident that it will work and that you haven’t introduced any errors by mistyping something. Of course, this should be balanced with opportunities to learn by writing your own code (even manually type out something you’ve found can be a good learning experience).
However, chances are that you’ll write a bit of original anyway, since you’ll probably have to modify anything you find to suit the situation at hand. At the very least, you should change variable names (what’s a variable?) to something more descriptive for your project.
5. Useful Options, Commands, or Keyboard Shortcuts
Here are some tips for working with code or text editors such as Notepad++, Sublime, or Atom.
Note: The exact keys vary depending on the editor and operating system (the below is meant for Windows PC). If you’re using a Mac, replace Cntrl with the Command button.
a. Word Wrap
This is usually under the View dropdown menu in your text editor. Basically, it shifts words to a new line when it would otherwise continue outside the window—it’s similar to how Microsoft Word automatically jumps to a new line once you’ve reached the maximum width of your document. Even if you have word wrap enabled, the code will still execute as if it were all written on the same line (this is very important in coding!).
b. Find and Replace: Cntrl + h
This is especially helpful for renaming variables, which can happen if you discover that a name conflicts with something else in your code, or for other reasons. Many text editors have extra options such as matching case.
c. Indentation: Cntrl + [ (increase indent) or Cntrl + ] (decrease indent)
Indentation is meaningful in most, if not all, coding languages. For example, code inside conditionals or loops often needs to be indented. As a visual cue, it’s also more human-readable that way!
d. Commenting Out and Uncommenting: Cntrl + /
To “comment out” something means to turn a block of code into a comment, thereby making it inert or dormant (the computer won’t run it). More specifically, changing that code into a comment signals the computer to skip those lines when running the program. “Uncommenting” is the reverse: your comment becomes executable code.
Some examples of comment format/syntax:

This is a handy and non-destructive way of “erasing” code without actually deleting it. Sometimes, once I’ve progressed to a certain stage, I create a duplicate or back up version of some code and comment it out. That way, if I play around with the code further and get stuck, I can always return to a clean copy that I know still works.
You can also use this technique to alternate between two options by commenting out the option you don’t need and potentially uncommenting it later when you need it. For example, say I want a Python script that I can apply either to a list of specific files or to every file in a specific directory. I could switch between the two like this:

Additionally, you can print variables or values (see below) to the screen to help with debugging and comment them out after.
6. If you think, “There must be an easier way to do this,” then there probably is
As I mentioned at the beginning of this guide, avoid reinventing the wheel wherever possible. In practical terms, this might mean searching for a code library that does what you’re looking for, rather than assuming you need to write something completely from scratch. If one library doesn’t have a built-in option for your specific use case, a similar one might. Similarly, if a would-be solution is hard to get working, don’t feel the need to make it work with brute force. There may be a different, less troublesome solution elsewhere.
When reading documentation, look for examples, screenshots, or videos that show you exactly what the end result of some code or process looks like. This will not only help with debugging by comparing what you expect to what you get; it’ll also help you decide if what you get is close enough what you’re looking for—or if you want to look elsewhere.
7. Print Early, Print Often
Printing things to the screen or console is usually one of the first command you learn in programming. Examples:

As mentioned above, you can print variables or values. This is helpful for checking if the output of a function is what you expected it to be. If you have a complex function with several discrete steps, or you pass the output of one function into the input of another, printing the output of each step/function can save you a lot of frustration. Otherwise, if something breaks, you’ll have a harder time figuring out where it goes wrong!
Yes, there will probably be an error message pointing to a specific line or spot in your code anyway, but I still prefer to know earlier where possible. A decision you make in solving the error may have consequences in other code elsewhere (e.g. choosing to ditch a specific library).
For example, I like to leave a print command, commented out, floating around at the end of some code like this:

8. Start Small and Scale Up
Another way to avoid frustration is to start with the smallest scope possible (in software development circles, called a Minimum Viable Product or MVP), and then increase the complexity gradually. I recommend saving the MVP separately before messing with it further. That way, you always have a workable version at hand.
Writing or testing code is an iterative or recursive process. It’s been described as pushing a broken car down a hill, tinkering under the hood, and then pushing it back up and down the hill again. Put simply, coders run their programs over and over and over again before they work satisfactorily. This might seem odd to humanities scholars when we obsess over just the right words or turn of phrase. Although writing is also an iterative or recursive process, we often go through several stages of revision before “testing” it on anyone, especially if we’re perfectionists.
However, in coding, writing big chunks of code before or without testing can end up working against you since we wind up in the same conundrum as in number 6: you know there’s an error, but you don’t quite know what it is.
9. Understanding Error Messages
If you’ve spent time copy/pasting solutions from the web, you may have noticed that said solutions seem to introduce their own errors. Here are some frequent examples:
| Error | Sample Error Message | Description | Possible Fix |
|---|---|---|---|
| Missing library | In Arduino:error: 'FastLED' was not declared in this scope |
Happens when you try to use a library that you don’t have installed or forgot to include/import it. | Go to Sketch > Include Library > Manage Libraries and install the library you need (here, it’s FastLED). If you installed the library but it’s still not working, you may have forgotten to include it with #include<libraryName.h> (where libraryName is name of the library). |
| Missing variable | In Twine:Error: <<print>>: bad evaluation: myVar is not defined |
_____ is not defined is a classic case of the missing variable. It happens when you call a variable without having defined or declared it (i.e. assigned it a value) beforehand.
If you copy/paste something from a help forum, this can happen because whoever provided the solution used arbitrary variable names for the sake of demonstration. There could also be a scope issue. |
Declare the variable somewhere in the code ahead (in an earlier line) than where you need it. Note that this will also depend on the scope you want your variable to have. Do you need to use the variable in multiple functions? Do you want the its value to be the same for each of the functions or change as the program runs?
It’s helpful to understand global vs. local variables too, but be aware that different programming languages or applications might handle scope differently. |
| You’re not my type | In Python:TypeError: Can't convert 'int' object to str implicitly |
For many coding languages, variables and values can be sorted into several data types (e.g. integer, string, list). When you try to perform an operation on one type of data that is meant for another type, you get this error.
In this example, Python is telling you that you’re trying to treat an integer (a whole number) as if it were a string (of letters or characters or, in other words, text). This error occurs if you try to drop an integer into a prose statement. |
Many programming languages have built-in ways of converting one data type to another. Here, you’d probably want the str() method.
You might also want to double-check what data type something is to see if you’ve declared it correctly. If you’re not sure what type a variable is in Python, you can use the type() method, which returns the type of a specific variable/value. |
| Syntax error | In JavaScript:SyntaxError: missing ; before statement |
This is maybe the most annoying problem of the bunch but also the easiest to fix. Chances are, you missed a punctuation mark somewhere. (A classic one is a missing semicolon at the end of a line.) | Pretty straightforward: find and correct the error. Sometimes copy/pasting the search error into Google will bring up a Stack Overflow question from someone who made a similar misstep. |
10. Read More Documentation
Hopefully these tips help, but there’s no real substitute for reading lots of documentation yourself and experimenting with code. Given how much documentation varies from source to source, it’s impossible to anticipate every potential situation you could encounter.
Over time, you’ll get a feel for the scope and complexity of different projects. Where possible, try to come up with a project driven by your own interests rather than an arbitrary exercise. Like learning any language, even a programming language, navigating documentation is a skill earned through practice and the motivation to make/say something meaningful to you.
[/et_pb_tab][et_pb_tab _builder_version=”3.17.3″ title=”3D (Structured Light) Scanner” link_option_url_new_window=”off” use_background_color_gradient=”off” background_color_gradient_start=”#2b87da” background_color_gradient_end=”#29c4a9″ background_color_gradient_type=”linear” background_color_gradient_direction=”180deg” background_color_gradient_direction_radial=”center” background_color_gradient_start_position=”0%” background_color_gradient_end_position=”100%” background_color_gradient_overlays_image=”off” parallax=”off” parallax_method=”on” background_size=”cover” background_position=”center” background_repeat=”no-repeat” background_blend=”normal” allow_player_pause=”off” background_video_pause_outside_viewport=”on” tab_text_shadow_style=”none” body_text_shadow_style=”none” hover_transition_duration=”300ms” hover_transition_delay=”0ms” hover_transition_speed_curve=”ease” tab_text_shadow_horizontal_length=”0em” tab_text_shadow_vertical_length=”0em” tab_text_shadow_blur_strength=”0em” body_text_shadow_horizontal_length=”0em” body_text_shadow_vertical_length=”0em” body_text_shadow_blur_strength=”0em”]
Overview
|
Should I use this scanner?
This scanner is especially helpful when…
The object you want to scan is unusually small or detailed. The HDI 120 is excellent at recording complex shapes or objects smaller than a baseball, which might be difficult to scan by other means. You can also move the scanner, which is mounted on a tripod, to capture features from different angles.
Surface texture is integral to the model’s success. Even surfaces that look smooth to the naked eye, such as pages from a book, appear textured to the scanner. This texture is visible in the resulting model. For example, in a model of an 1898 book (by William Morris), you can see the impressions the type and woodblocks made during the printing process.

You want to create a watertight model for 3D-printing or you want to modify the model after scanning. Flexscan 3D, the software interface for scanning and processing the model, can fill in holes automatically or using more fine-grained options. You can export models in STL, OBJ, or other formats and open them in 3D-modelling software such as Tinkercad, SketchUp, or Blender to make modifications (we offer free workshops in Tinkercad). Or, you can insert them directly into MakerBot Print and email us the .print file (see our 3D Printing FAQ page).

You are scanning in an environment with poor lighting or where you cannot place markers on or around your object. In photogrammetry, one popular method of 3D scanning, a model’s success depends on the quality of the images and the number of distinct reference points such as markers placed on or around the object. However, in some cases, too bright lighting can damage an object or surface, or it may be difficult or undesirable to attach markers to the object itself. Scanning with the HDI 120 avoids these problems.
This scanner is NOT helpful when…
You want to scan large objects or recreate features such as architecture or landscapes. The HDI 120 works best with relatively portable objects and it comes with a rotary table, which you can use to rotate and scan an object automatically. To fit on the rotary table, an object should be no bigger than a basketball. So long as an object fits in our scanning room, you can scan it without a rotary table, although this would require more post-processing. Recreating architecture or landscapes is better suited to software such as SketchUp or 3D-mapping with drones or aerial photographs.
You want to scan persons or moving objects. Each scan takes at least a few seconds on the HDI 120. This makes the scanner unsuitable for capturing moving objects, even if the object (or person) moves only a few degrees.
Colour is integral to the the model’s success. Although there’s limited support in Flexscan 3D for overlaying images or patterns on the model’s surface, capturing colour is better suited to photogrammetry or a structured light scanner with photographic capabilities (such as the GoScan 20 in the library’s Digitization Centre).
The object can be broken down into simple shapes (e.g. cubes, spheres, or pyramids). In this case, it may be easier to create a model from scratch in a program such as Tinkercad rather than scanning the object. This could have the added benefit of a smooth surface rather than the grainy texture the HDI 120 would provide.
How does this compare to photogrammetry?
Photogrammetry (Wikipedia) relies on taking 2D photographs and using reference points that appear in more than one image in order to construct a 3D model. Examples of photogrammetry software include PhotoScan and Scann3D. However, the HDI 120 doesn’t use photogrammetry. Instead, it uses a process called structured light scanning (SLS): it triangulates points in space based on the way light distorts when hitting an object’s surface. With structured light scanning, each scan results in a 3D mesh whereas, in photogrammetry, each “scan” is actually a 2D image.

Because of this, you don’t have as much control over individual scans in photogrammetry as you would with SLS. In photogrammetry, assembling the scans into a model is handled automatically by the software and this process is rather opaque. By comparison, you can take multiple scans of an object (each called a “mesh”) and piece them together in FlexScan 3D by clicking and dragging like assembling a 3D puzzle. You can select and move overlapping meshes into roughly the same position, then click “Align” and FlexScan 3D will automatically align them more precisely. You can edit each mesh individually and/or combine meshes into a finalized model. By contrast changing or editing the requisite photos in photogrammetry often means you have to run the entire assembly process over again without previewing the results.
Example Research or Teaching Scenarios
In a museum or classroom setting, structured light scanning can be a non-invasive way for audiences to interact with an object both on and off-screen (with printed models), where the object might be too fragile or rare to handle. In some cases, museum staff may scan a model and use it as the basis for computer-aided restoration (see Kęsik et al.).
A 3D-printed model may convey a sense of size, proportion, or texture that would be difficult to grasp when viewed on-screen. One example of this is the 3Dhotbed project, a collaboration between library professionals from universities in the United States. This project seeks to enhance book history instruction, chiefly through models of typecasting equipment that are difficult to find in their original form.

With regards to media history, the UVic MLab has used the HDI 120 to produce models for research and experimentation. For example, MLab researchers scanned late 19th-century telephone receivers and transmitters when remaking early magnetic recording experiments (1898). As part of the Early Wearables Kit, they also scanned a sculpture of a skull and shrank the model down in order to study whether a skull stick-pin, of the particular size and shape its inventor claimed, could really have functioned at that scale.
Structured light scanning is also used in disciplines such as archaeology, anatomy education, and zooarchaeology to document 3D objects or features both in labs and in the field. For example, Hess, MacDonald, and Valach scanned models of two ancient Roman coins and praised structured light scanning for its precision, flexibility, and transportability compared to other methods (see references for more information).
How to Use the Scanner
Workflow
Here are the steps to generate a 360-degree model of an object:
- Setting up the scanner and collecting scans: this involves positioning the scanner, calibrating the rotary table (if using).
- Post-processing: this involves digitally stitching together the meshes, deleting unwanted geometry, and filling in any holes in the model (see “Navigating the Software” for more details)
- Exporting the model: Now you have a high-quality model that you can export as an .stl or .obj file and import it into 3D-modelling software. If all holes have been filled, the model is also watertight and can be 3D-printed by inserting the model into a MakerBot Print file.
Scanning without the Rotary Table
- Prepare and position the scanner. Click on the “Projects” tab and create a new project or open an existing project to keep working on it. In The scanner’s camera should turn on and you can see the live feed in the panel on the right side of the screen (see image below). Adjust the scanner so that the object is visible in the feed.
- Adjust the exposure. In the camera feed, areas are coloured white, red, or blue (see images below).
- Areas in white are surfaces or geometry that the scanner will pick up well.
- Areas in red are over-exposed, i.e. too close to the scanner (with current settings) to pick up well. Lower the exposure or move the object further from the scanner.
- Areas in blue are under-exposed, i.e. too far away for the scanner (with current settings) to pick up well. Increase the exposure or move the object closer to the scanner.
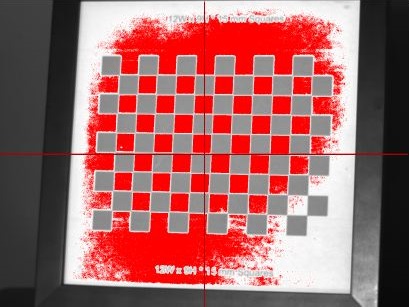

Images of a calibration sheet as seen through the live feed. Areas in red are over-exposed (left) while blue areas (right) are under-exposed. Images from the FlexScan 3D manual.
Above the live feed is the exposure panel. Click and drag the slider left or right to adjust the exposure and the live feed will change colour accordingly. You want as much of the object as possible to look white onscreen.

FlexScan 3D has some options for automatically setting exposure. On the left-side panel (see image left), under “Easy Scan,” you can click “Auto Exposure” and FlexScan will try to optimize the exposure level for maximum detail and fidelity (results vary). After auto-adjusting, you can still manually tweak or fine-tune the exposure setting. You can also click the bright red “Scan” button and see what mesh is actually generated. This scan can also help you decide what exposure works best.
3. Scan the object, reposition the scanner, and adjust exposure as needed. When you’re ready, click “Scan” and the scanner will scan the object and create a “mesh.” Reposition or rotate the object and then click “Scan” again to generate another mesh. Repeat until you’re satisfied that you’ve captured all the surfaces and details you need.
4. You’re now ready for post-processing. See the “Post-Processing” section.
Scanning with the Rotary Table
The rotary table is useful when you have a relatively small object and want to make a 360° scan. Without the rotary table, you would have to manually rotate the object between scans. You can also do a combination of scanning with and without the rotary table. For example, after using the rotary table, you can flip an object to scan the underside and then combine the meshes together.
1. Calibrate the rotary table. For the scanner to automatically generate meshes for an object on the rotary table, we must first calibrate the scanner so that it knows the distance from it to each point of the object on the rotary table. Place the calibration sheet (a checkerboard of white and black squares) on the book rest and place them close to the centre of the rotary table.
 On the left-side panel, check the box next to the “Rotary Table” heading (see image left or right). Adjust the calibration sheet so that the grid is fully and clearly visible from both live feed windows (you may have to adjust the exposure). Try to align the crosshairs in both windows on the same square, although a little deviation is fine. Click “Calibrate.” The rotary table will begin to rotate and the scanner will scan the calibration sheet from different angles.
FlexScan will say if calibration was successful or unsuccessful. If the calibration was unsuccessful, reposition the calibration sheet or adjust the exposure and try again. Once the scanner is successfully calibrated, avoid moving the rotary table or the scanner. If you have to move them, you can recalibrate the scanner (click “Recalibrate” in the Rotary panel).
2. Scan the object and adjust exposure as needed. The rotary panel allows you to select how many scans to take of the object in one full circle of the table. For example, if you select 8 scans (which is usually sufficient for a good model), then the scanner will take one scan every 45 degrees. When ready, continue to post-processing.
Post-Processing
You should now have a bunch of meshes representing your object that need to be merged into a single model.
Aligning and Combining Meshes
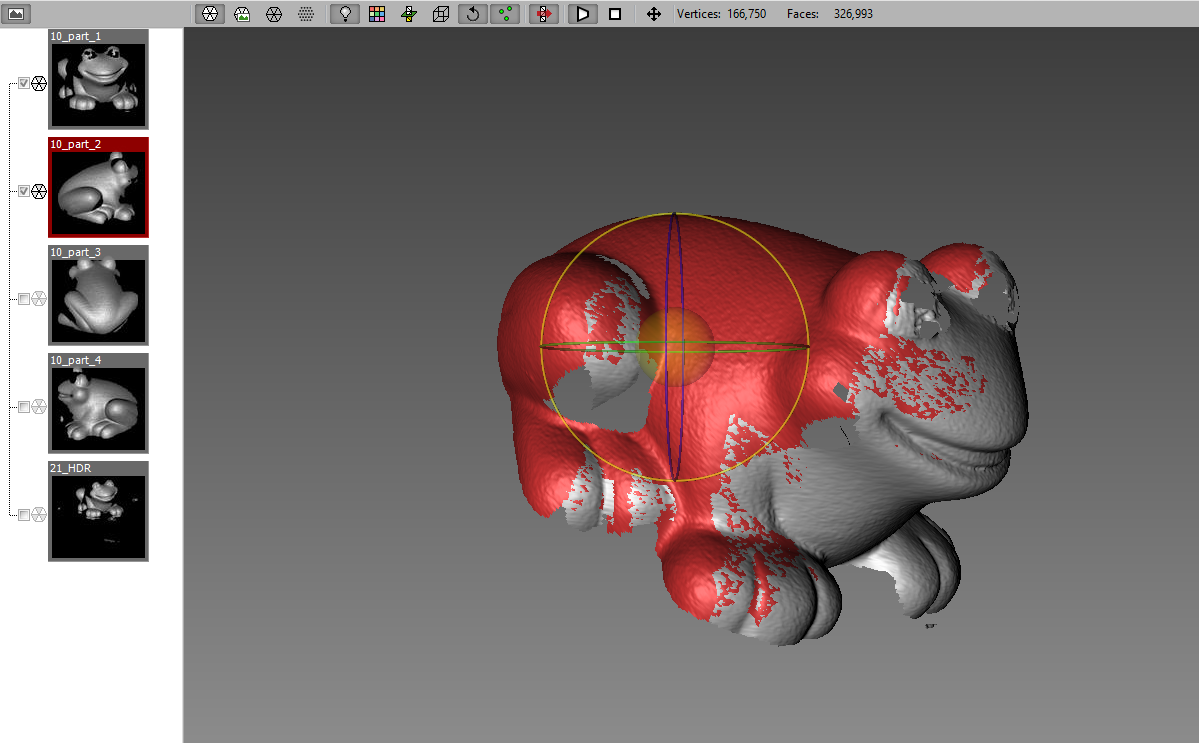
- To select a single mesh, click its thumbnail on the left. The selected mesh will turn red and there will be a yellow sphere, surrounded by circular outlines in blue, green, and red (the x-, y-, and z-axes). Then you can move the mesh around the screen by clicking and dragging the yellow sphere, or you can rotate the mesh around the x-, y-, or z-axis by clicking and dragging a circle.

Image of two scans of the same object aligned together, with one of them (in red) currently selected for moving or rotating. - Position and rotate a mesh over at least one other mesh, so that the two meshes overlap over a common point or feature. The fit doesn’t have to be exact since FlexScan will automatically align the scans more exactly. Then select both or all meshes (use Cntrl-click to select multiple meshes) and click the “Align” button at the top. Now the scans are grouped together. To unattach and re-align them (e.g. if they’re misaligned), double-click on each thumbnail and you’ll be able to select and align the scans again.
3. To delete unwanted geometry by holding down Cntrl and clicking/dragging the area you want to delete. Press the delete button to delete.
4. Once two meshes are aligned, they are in the same alignment group. This means that you can select two meshes that you want to align, one in part of a group and one you want to merge into that group, and align the second mesh to all other scans in that group.
5. When you’re satisfied, you can select multiple meshes and combine them together (Click “Combine”). The advantage of combining meshes is that they will be “locked” together (you can double-click to unlock them). Eventually, all meshes should be combined into one model.
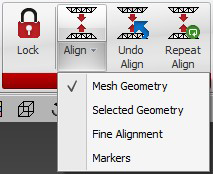

Image of two scans of the same object aligned together, with one of them (in red) currently selected for moving or rotating.
Finalizing and/or Exporting the Model
6. Once all meshes have been combined, you can finalize the model by clicking “Finalize.” The finalize panel and options will appear. Here you can fill in small holes in your model or smooth its texture.
7. Adjust the “Hole Filling” slider as desired. Selecting “High” will fill in the holes completely. This is useful if you want to create a watertight model for 3D-printing. Note that Flexscan will make educated guesses based on the surrounding geometry in order to fill in holes. If the results aren’t what you wanted, you may have to uncombine the scans and take additional scans before aligning, recombining, and finalizing the model again.
8. You can also have more fine-grained control over hole filling. See tinyurl.com/y7nezezt for more.
9. If you want a smoother texture or a smaller (in terms of file size) model, you can adjust the “Smoothing Options” slider or check the “Decimate” box and click/drag the slider left or right. The “Decimate” option makes the model less dense by systematically getting rid of some vertices in the model. The result is a very similar model that takes up much less storage space.
10. You can also export the model (click “Export” along the top toolbar) as an .obj or .stl file (and other file extensions). You can insert this file into Makerbot Print or other 3D printing or design software. (To learn more about 3D Printing at the Digital Scholarship Commons, see oac.uvic.ca/dsc/how-to-3d-print.)
Mouse and Keyboard Shortcuts
| Button or Keys | Action |
| Left click on empty space and drag | Rotate around the model |
| Center mouse button and drag | Pan the model |
| Click and drag the yellow circle (after selecting a mesh) | Move the entire mesh, keeping the same orientation (i.e. without rotating) |
| Click and drag along the green, blue, or red circles (after selecting the mesh) | Rotate the mesh around an axis (X,Y, or Z) |
| Cntrl + click and drag | Select geometry |
| Delete (after selecting geometry) | Delete the selected geometry |
| Hold down Cntrl + click on the thumbnails for each you want to select | Select multiple meshes |
| Select at least one mesh, then Cntrl + a | Select all meshes |
| Click the revert button | Undo an action (unfortunately, Flexscan 3D can only undo the most recent action) |
Acknowledgments
Thanks to the UVic MLab (especially Katherine Goertz, Danielle Morgan, and Jentery Sayers) and the Humanities Computing and Media Centre (HCMC).
References and Further Resources
Belojevic, Nina et al. Early Wearables Kit (2015), Nov. 2015, github.com/uvicmakerlab/earlyWearablesKit
Goertz, Katherine. “Handling History with a Scanner.” UVic MLab, May 15, 2016, maker.uvic.ca/scanner/
Goertz, Katherine, Danielle Morgan, and Jentery Sayers. “3D Scanning.” Physical Computing and Fabrication (DHSI 2016), University of Victoria and GitHub, 2016.github.com/uvicmakerlab/dhsi2016/blob/master/3Dscanning.md
Hess, Mona et al. “Application Of Multi-modal 2D and 3D Imaging And Analytical Techniques to Document and Examine Coins on the Example Of Two Roman Silver Denarii.” Heritage Science, vol. 6, no. 5, December 2018, link.springer.com/article/10.1186%2Fs40494-018-0169-2
Jacobs, Courtney, Marcia McIntosh and Kevin M. O’Sullivan. 3Dhotbed project, n.d., www.3dhotbed.info/project/
Kęsik, Jacek et al. “An Approach To Computer-aided Reconstruction Of Museum Exhibits.” Advances in Science and Technology Research Journal, vol. 11, no. 2, 2017, pp. 87-94. doi:10.12913/22998624/69419, astrj.com/An-approach-to-computer-aided-reconstruction-of-museum-exhibits,69419,0,2.html
LMI Calibration page (for calibrating the rotary table). oac.uvic.ca/dsc/wp-content/uploads/sites/2373/2018/11/Duo_CalibImage_10mm.pdf
LMI Technologies YouTube Channel (see videos on Flexscan 3D). youtube.com/user/LMITechnologies/videos?flow=grid&view=0&sort=da
“HDI 100 Series User Manual.” LMI Technologies. (Note: to download, you must create a free account with LMI.) downloads.lmi3d.com/?brand=151&product=6056
[/et_pb_tab][/et_pb_tabs][/et_pb_column][/et_pb_row][/et_pb_section]