Create and Edit Videos
Create media
Echo360 allows students to record high quality videos and upload existing files to existing assignments and quizzes. This includes, video tutorials, powerpoint presentations, and other media files.
How to upload media to Echo360
Existing media might include recordings made in Zoom or teams, previously recorded video tutorial files, powerpoint presentations, etc.
In Brightspace, navigate to your Echo360 Library by selecting Course Tools and then selecting Echo360 Library from the dropdown menu.
To upload a file to your Library
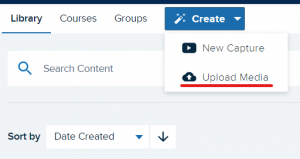
- Click Create.
- Click Upload Media.
- At the following screen, select the file(s) that you want to upload. You may select one or multiple files for upload.
- Cick Upload.

The upload window changes to provide an upload progress bar. When finished, the window disappears. IMPORTANT: DO NOT close the upload window before the upload(s) completes. This will cancel the upload.
The newly uploaded file appears in your Library but is dimmed while it is processed. You may need to refresh the page to see the newly uploaded file.
How to record in Echo360
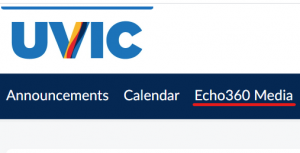
From the Brightspace homepage, click on Echo 360 Media, or click Echo 360 Media in Course Tools and choose “Create” and “New Capture.” This will prompt you to download the Universal Capture software for Mac or PC. Once this has finished downloading:
- Give your capture a title, description and tag.
- Choose the quality of the capture
- Choose the inputs (audio, video etc.)
- Click record

Edit media
Echo360 provides a basic, easy to use video editor for trimming and making cuts in your video content. When you edit a video, you can choose to publish changes to the original video or save the revised version as a new video. Please note that there is often a delay between when a video is uploaded / recorded and when the video and transcript are available for editing.
How to edit in Echo360
To edit a video:
The video editor can be launched from your from your personal library.
- From your personal library: locate the video you wish to edit. Click on the ellipsis in the bottom right corner of the tile, and choose Edit media
Options for editing your video
Once the editor is open, the following basics are available:
- playback controls
- Zoom in/out
- Top and Tail buttons to trim the video
- Cut button
- Delete button
- Trim Handles to edit segmants of the video
- Redo/Undo
Use the buttons across the top to complete your editing and process the video with your changes (editing functionality descriptions in full).
When you have finished editing, save your video:
-
- SAVE – Applies the changes you’ve made to this video. After Save, the changes are applied to all published (and shared) versions of this video. Once processed, the edited version replaces the original version in all locations.
- SAVE AS – Creates a NEW VERSION of the video based on your edits. In addition, you are now the owner of the video, regardless of whether you were the owner of the original video. You also have the option to save a course copy which allows you to select a publishing location for the new video.
- RESTORE – Reverts all changes ever made to the video and restores the original video file. This option is only active if you open a video that had previous edits applied to it.
- To exit without saving any changes, click the back arrow in the top left corner of the video editing screen. Any work in progress will be saved within the Editor, but not yet applied to the published media.
Processing Occurs Immediately: After selecting to Save, Save As, or Restore, the processing of your changes begins immediately, however processing may take some time to finish, depending on the video length and the number of edits. This means two things:
- Students or other users will not see the edited version until processing is complete.
- You should not try to re-edit the video until the initial changes are processed.
Additional tips on Editor Shortcuts, cutting segments, trimming ends of recordings, editing segments can be found in this Editing Videos resource.
How to edit captions and automatic transcriptions in Echo360
Echo360’s automatic speech recognition (ASR) improves accessibility by creating searchable transcripts of recorded (and uploaded) videos so that learners can listen to and read course content, and re-listen and re-read content as well. Transcripts are editable and can be published as closed captions as well. For more information see: How to edit transcripts and captions in Echo360
