Oseberg Narrow Band


Background


This image has a dark wooden background. On it, from top to bottom, is a black, leather belt, a spool of green thread tied to a cardboard shuttle, a orange mechanical pencil holding together white paper tablets, and green, beige, and brown threads coming from the tablets.
The supplies I used for my project. Tablets made from cardstock, a mechanical pencil used to hold tablets together when not in use, green thread for the weft and a cardboard shuttle, and a black leather belt to tie one end to.

My pattern for this project is the Oseberg Narrow band, from a Viking-age burial in Norway. I will be using cotton thread in brown, beige, and green, modifying the pattern slightly to give it a border in order to use all three colors.

This image shows a white background with a light yellow and blue woven band in the center. Below the band is two threads, one of the matching yellow and the other the blue from the band itself. Above the band is a ruler, showing 1-70 mm.
A reproduction of the Oseberg Narrow band. Image from Shelagh’s website.

Warping & Weaving


To begin my pattern I first had to warp my threads, meaning I had to measure, cut, then thread each piece through the tablets in the correct direction. To measure my thread I used the length of a table, and cut each thread the same length across it. I followed the amount of each color, with modification on the borders, based upon my pattern, and first organized the threads into bundles based upon the card they belonged to. This organization method worked out alright for me as my pattern was not too complicated.

Once I had every thread cut, I then had to thread them through their respective cards. I realized that I had been following an alternative pattern when cutting my threads, but it was quickly rectified as both ultimately required the same amount of each color. Next, I had to figure out the difference between S and Z threading.

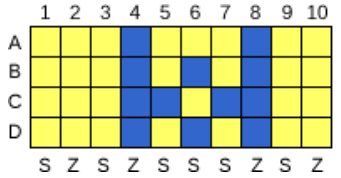
The difference between S and Z threading took me a while to understand, but with the assistance of multiple google searches, I finally had all my threads sorted properly. However, my threads became very difficult to work with once warped. The longer end kept getting knotted, and it took me about 30 minutes to untangle them. This continued to be a problem as I started weaving, as at some point while I was attaching one end to a door handle, the threads had managed to flip. It took me quite awhile to fix this, sorting the ends into two bundles which then tied to my belt, but once I had I was able to begin weaving.

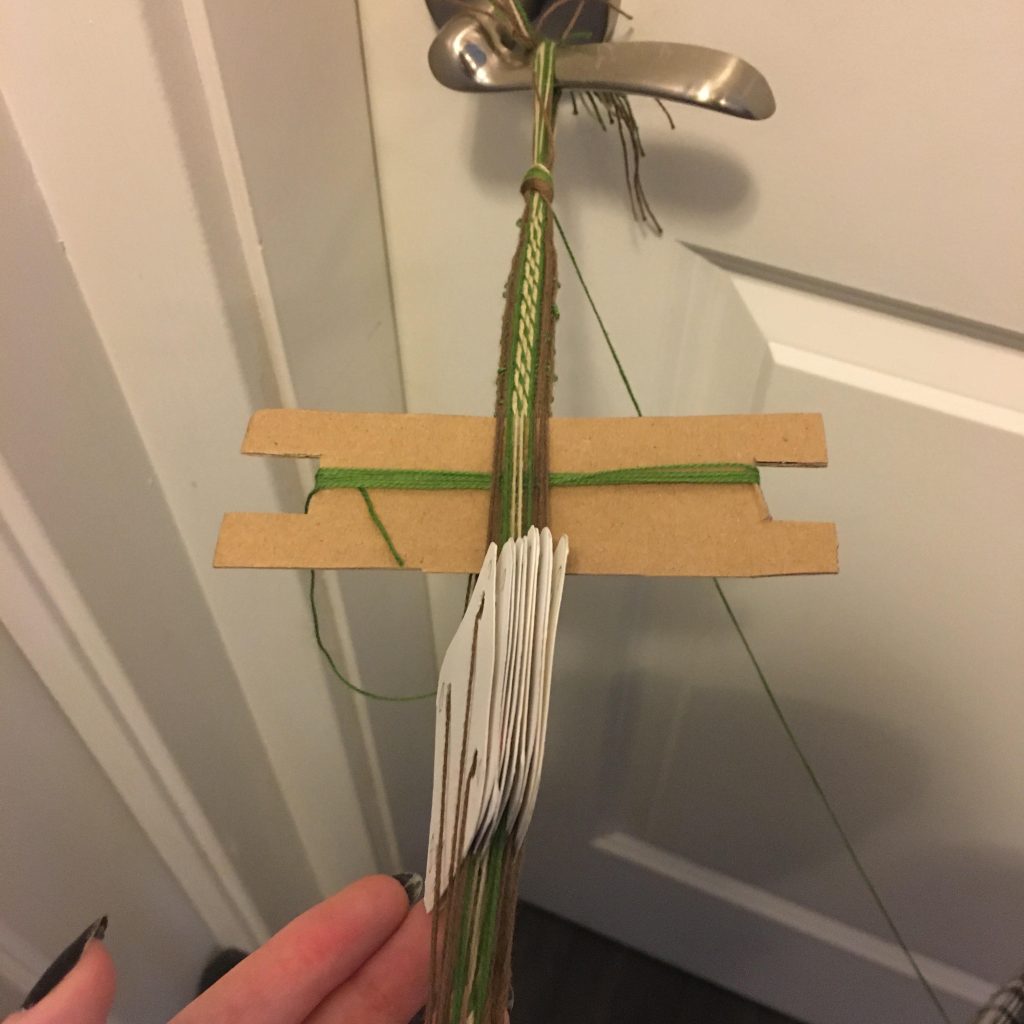
My pattern called for all my tablets to be turned the same way, which allowed for me to focus on my tension and keeping my cards organized. I didn’t anticipate how much thread I would need for the weft, so as pictured there is not enough currently on my shuttle. This is a problem that will have to be fixed at a later date, as my partners have already suggested how to fix this. I also didn’t understand how much I would have to pull the weft through, worried that it may unravel, so there are green bumps throughout the section I’ve done. I’m proud of how much I achieved in an hour of work, and while bumpy, the tension is good and the pattern is clear. I foresee this becoming cleaner as I continue, and hope that the end product will demonstrate my learning.


Thank you for reading! Until next time…

-Tika

Birka B2 Progress Report

Background


For this project I chose to reproduce the tablet woven Birka band B2 which originated from the archeological site, Birka, which is located on the Björkö Island in Lake Mälar, Sweden. The band in question dates to the 9th-10th centuries and was discovered in grave 824 In two separate pieces connected to two oval brooches.

Pattern


The pattern I used in the reproduction of this band was written by Shelagh Lewins and was made available for free download through her blog. The pattern utilizes a missing whole technique and in an attempt to replicate the motif present in the original brocade band.

This image depicts a reconstruction of the Birka B2 band, woven in red and yellow threads.
Image of the reproduced band produced by Shelagh Lewins with the use of the pattern she developed.

Creating the Warp


In order to begin weaving I first had to make up the warp as directed by the pattern. The warp is the direction of threads which will be threaded through the tablets and woven into.

On the left hand of the image there is an image of the tablet woven band designed after Birka B2. In the middle of the image there is a diagram outlining the weaving instructions. Finally, on the right side of the image there is a diagram outlining the warping pattern.
An image of the threading and weaving diagram as provided by Shelagh Lewins.

I began setting up my warp by picking my colors, ultimately deciding to solely use the brown and cream we had purchased as a group. Following the warping diagram from the right side of the image I cut my threads to my desired length prior to laying them out on a table. These were taped in place so that I could keep the threads organized.

As we set up our warps as a group on campus my warp needed to be transported home prior to being threaded through the tablets. To do this I chained my warp threads together to stop them from tangling.

In the middle of the image there is a group of fine brown and cream threads chained together to form an organized loop. resting atop the threads in a cone of cream yarn. These are both sitting on a colorful quilt.
This image showcases the warp which I will be using for this project as it was packaged for transportation alongside the thread which I will use for weft.

At this point I began threading my tablets, following the diagram from left to right, placing the threads in the designated holes on the tablets. Unfortunately, although my threads had been taped in the proper order and chained together in an effort to keep them organized it did take me a while to figure out how to thread my warp as a few of the threads seemed to have shifted positions. This meant I had to spend some time reorganizing my threads to get them back in the proper order.

This image shows three wooden tablet weaving cards in the process of being threaded with brown and cream cotton yarn.
This image shows three of the tablets being threaded with yarn.

Unfortunately, it also seems that throughout the transportation of my warp some of my threads were tangled, which meant I had to spend a great deal of time untangling the threads before I could begin weaving.

This image shows a hand holding 20 tablet weaving cards threaded with brown and cream threads.
This image shows the threaded warp after it was untangled.

Thankfully, after about 1-1.5 hours of work with a helping hand I was able to get my threads untangled and am now ready to start weaving!


Until next time,

Kierrah