This final poster marks the completion of our project as it will showcases our project including its successes and struggles while also featuring our concluding remarks.

Thank you for following our journey,
Kierrah, Tika, and Quynn
This final poster marks the completion of our project as it will showcases our project including its successes and struggles while also featuring our concluding remarks.
Thank you for following our journey,
Kierrah, Tika, and Quynn
During my last progress report I talked about the inspiration behind my tablet weaving project and discussed the process of creating a warp and setting up to weave. Now I have had a chance to complete some weaving and I’m here to talk about it!
To start weaving I tied two knots in one end of my warp to provide myself with a sturdy loop I could wrap around a door or dresser handle to hold my project in place. I ended up primarily weaving off of a handle on my dining room table as I was then able to keep my weaving chart on the tabletop for easy access.
Starting the weave was more challenging than anticipated for a few reasons.
Firstly, I automatically noticed that the knot I had used to secure the warp was affecting the thickness of the fabric as the threads were being held together by the knot. Consequently, The fabric I was creating was narrow, thick, and stiff.
I also noticed that the pattern was not showing up as pictured. At first I figured that this was because of the issues caused by the knot so I continued weaving hoping the threads would begin to straighten themselves out.

As I went on it became clear that I had a mistake in my warp as the pattern was still not clear.
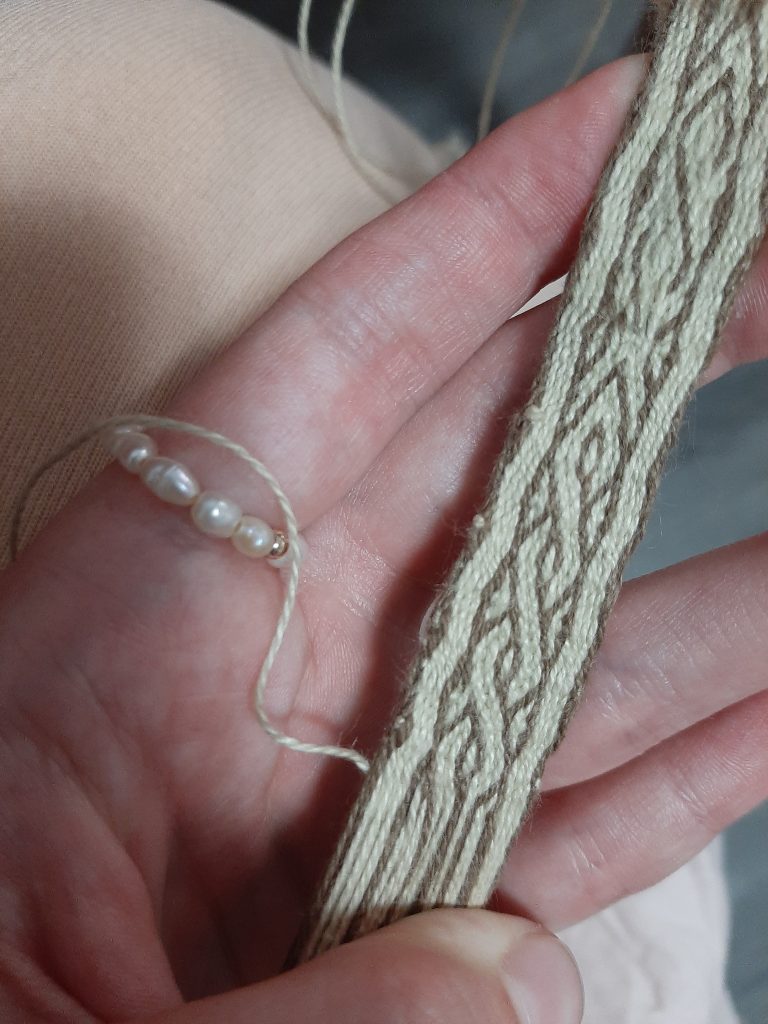
I checked my threading time and time again making small changes here and there in hopes of fixing the problem but nothing seemed to work. That is until I finally realized my most crucial mistake. It seemed as though I had mixed up my s and z threading. That is the direction that the yarn is threaded into the tablets, as seen in the photo below.

Although I am sure I had originally threaded my warp correctly I think all the fiddling messed something up so I was forced to flip my cards. I also had a few cards that needed to be adjusted forwards or backwards to ensure I had proper threading. This is why, as you will see in my photos, the marks on my tablets do not match up entirely, as those are the cards that had to be shifted.

After all that hassle I thought I had fixed the problem and began weaving again. The width and texture was improving but my pattern still remained unclear. That is until I looked at the back. It wasn’t exactly my pattern but something was showing up and I could tell it was a start.

Realizing that for some reason my weaving was showing up on the bottom even though my cards were threaded properly I decided to try weaving in reverse, or at least moving my cards in the opposite direction of that instructed on my pattern.
It was surprisingly nerve wracking weaving without seeing what I was doing. Only hoping that it would work. But In the end I was pleasantly surprised. The pattern was there and it looked better than I could have imagined!
Since then I’ve continued my weaving. Although I’m still working upside down (I don’t want to chance it) the weave is only getting better and better. I’m getting faster too. At this point it takes me 40 minutes to an hour to complete the whole pattern repeat and It’s becoming easier to remember what steps come next. Although some days weaving is still frustrating, like when I forgot to add a thread or the tension is off, I am finding it more and more relaxing. I’ve been working on it so much I am almost out of warp!

Anyway, I can’t wait to see the final project so that I can reflect on what i’ve learnt.
Until next time,
Kierrah
For this project I chose to reproduce the tablet woven Birka band B2 which originated from the archeological site, Birka, which is located on the Björkö Island in Lake Mälar, Sweden. The band in question dates to the 9th-10th centuries and was discovered in grave 824 In two separate pieces connected to two oval brooches.


The pattern I used in the reproduction of this band was written by Shelagh Lewins and was made available for free download through her blog. The pattern utilizes a missing whole technique and in an attempt to replicate the motif present in the original brocade band.

In order to begin weaving I first had to make up the warp as directed by the pattern. The warp is the direction of threads which will be threaded through the tablets and woven into.

I began setting up my warp by picking my colors, ultimately deciding to solely use the brown and cream we had purchased as a group. Following the warping diagram from the right side of the image I cut my threads to my desired length prior to laying them out on a table. These were taped in place so that I could keep the threads organized.
As we set up our warps as a group on campus my warp needed to be transported home prior to being threaded through the tablets. To do this I chained my warp threads together to stop them from tangling.

At this point I began threading my tablets, following the diagram from left to right, placing the threads in the designated holes on the tablets. Unfortunately, although my threads had been taped in the proper order and chained together in an effort to keep them organized it did take me a while to figure out how to thread my warp as a few of the threads seemed to have shifted positions. This meant I had to spend some time reorganizing my threads to get them back in the proper order.

Unfortunately, it also seems that throughout the transportation of my warp some of my threads were tangled, which meant I had to spend a great deal of time untangling the threads before I could begin weaving.

Thankfully, after about 1-1.5 hours of work with a helping hand I was able to get my threads untangled and am now ready to start weaving!
Until next time,
Kierrah
Gathering materials has been a crucial step in the creation of goods throughout history.
In order for us to begin work on our experimental archeology project we needed to start by gathering the necessary supplies.
Before we began our search we decided that there were a few factors which needed to be considered during our hunt for supplies. Firstly, It was important to everyone in our group that the materials were accessible. In this case, material accessibility meant that the materials were available locally, being easily accessible by bus, and that the materials were of a reasonable cost. Considering this, It was important to the group that as many of the necessary materials as possible were borrowed or made out of recycled material. Not only does this support the groups desire for accessibility, keeping costs low, this also ensures the projects sustainability, avoiding unnecessary consumption of materials which would be used for a single project. Considering our focus on accessibility and sustainability there were instances in which we chose to forgo complete historical accuracy. Instead we chose to focus on the functionality of our chosen materials, aiming for materials that would function like their historic counterparts, without feeling like it was strictly necessary to gather completely accurate materials. We felt that this was the right decision for this project as it is practically impossible to achieve complete historic accuracy, especially given the time constraints for this project.
Considering these factors we began our search for supplies.
There were a few supplies which were necessary for us to gather before we began our project. These supplies included; weaving tablets, a shuttle, a belt, and, most importantly, 2-3 colors of yarn.
We were able to gather a variety of weaving tablets for this project. Two of these sets were borrowed, one made out of wood, and the other out of paper, and a third set was constructed out of a thick sheet of cardstock. The shuttles were also constructed out of a piece of cardstock. Finally, the belts were similarly constructed out of recycled materials, being made of pieces of ribbon and lacing.

The yarn was the most difficult of the supplies to gather as It was time consuming to find something suitable for our project which was available locally.

We started our search at the Beehive wool shop as they are located in downtown Victoria and provide a range of yarns made out of natural materials.
There were quite a few lovely options for wool, silk, and linen fibers which would have provided us with historically accurate materials for our project. This being said, the majority of these fibers were either too thick for weaving or extremely expensive. This is because this shop caters to knitters and crocheters, thus the products in store are not produced with weaving in mind. Considering this we were forced to look elsewhere for our yarn.

After some online research we found Knotty by Nature Fibre Arts was a local store that sold a variety of weaving yarns. Although the store seems to primarily house dyed wool roving, used for spinning, and knitting yarns there was a small collection of weaving yarn available, with the majority of the collection being 100% cotton. Although cotton is not particularly historically accurate we decided that this yarn fit our requirements best as it was still a natural fiber and was the right size for our project while also being in the right price point. Considering this, we met up at the store and picked out our colors as a group, picking out three matching yarns in a bright green and more neutral brown and beige.

Finally we were ready to weave!